|
|
|
||||||||||||||||||||||||||||||||||||||||||||||||||||||||||||
|
MVE provids a userfriendly graphical interface. All functions can be controlled by the corresponding icons in the left window, called "Function Window". Depending on which module you are using, only the functions which are concerned with this module are visible inside the function window.
In the Volume viewer, the volume object can be rotated, scaled and moved in real-time by your mouse. If you want to rotate the volume object, press the left mouse button inside the visualization window and move the mouse while the button is pressed. For scaling, use the mouse wheel to zoom in and out. If you want to move the volume object, press the right mouse button iside the visualization window. When the the object is rotated the next time, the object is first placed at the middle of the visualization window.
In order to select one of the three modules, press the left mouse button on one of the four register buttons at the top of the function window. The Image Viewer displays flat 2D images of axial, coronal and sagital slices. It is the only module availble for 2D data like bmp, jpg and tif files. The Volume Viewer displays a 3D image by "Direct Volume Rendering". The image can be rotated and scaled in real time. Several visualization functions are available like Maximum Intensity Projection (MIP), clipping volumes with free angles, stereoscopic view, different resolution, lighting functions and some more. This module is only available for 3D data files. The Information Viewer displays informations about DICOM and ANALYZE files.
In the File Viewer you can choose between a list view and an image view. The size of the preview images can be changed between 3 sizes, overlay file information can be turned on or off and you can select all files in the directory at once.
The register buttons switch between the axial view (from bottom to top), the coronal view (from front to back) and the sagittal view (from left side to right side).
With the left button, the "Select image" dialog is opened and a single image can be selected out of the set of opened images. With the slider and the edit control on the right, the number of the current image can be selected. If the mouse is placed on top of the edit control, the total range of images is displayed as a hint text.
With the fist button, you can turn on/off the interpolation of an scaled image, if the image is displayed with an enlarged size. The next button "1:1" resets the scale of the current image back to its original scale of 100%. In order to fit the image into the current window use the third button "FIT". The fourth and fifth button will enlarge and shrink the current image. On the edit control at the right side, the current scale of the image is displayed in percentage.
To turn the image left or right, use the first two buttons. If you want to flip the image horizontally or vertically, use the last two buttons. Please note, that the orientation will be reset after a property of the current image is changed, like a different level/window setting.
For the image viewer a 10mm grid can be displayed/hidden by pressing the "Grid" button. The distance between two points in an image can be measured by the "Measure distance" button. For the volume viewer a 10mm grid is available by the "Grid" button. A surrounding frame is enabled/disabled by the "Display frame" button. The number of frames per second are displayed/hidden by the "FPS" button. Pleaese note that calculating the FPS rate causes a permanent load of the CPU. If the user switches the context to another program, the FPS function pauses until MVE gets again the context. A "Maximum Intensity Projection (MIP)" can be activated by the "MIP" button. The maximum intensity projection displays the colors of the voxels with the highest values along the view ray through the volume object. Given a small volume this function can be used to detect blood vessels - using radiopaque materials - inside the tissue, which would be hard to visualize otherwise.
The current level and window settings can be changed either with the slider or with the corresponding edit controls. The middle arrow at the slider is the level arrow and represents the current level setting. The width of the two interval arrows - left and right beside the level arrow - set the window value. The interval arrows can operate in two different modes: either both arrows are moving at the same time if you drag one of them (level arrow is red), or one arrow is fixed and only the dragged arrow is moving together with the level arrow (interval arrows are red). The two operating modes can be switched by a double click on the slider control. The edit control for the left and right value correspond to level-window/2 (left) and level+window/2 (right). The level and window edit control set the corresponding values. The reset button sets the level and window setting to the default values. Please note that a dicom file set can have several default level/window setting, which have been chosen by the radiologist.
- black and white (this is the standard), - color with constant luminance and - color with raising luminance. The last two color sets achieve a pseudo coloring of the image, where the data values are projected into a color scale. The current color set can be inverted by the "Invert colors" button.
The position of the axial plane is controlled by the first slider and the corresponding edit control on the right. The position of the coronal and sagittal planes are set by the second and third slider and edit controls. The left buttons make the corresponding planes visible or invisible. The last slider and edit control sets the transparency of the planes in percentage. 0% means totally transparent, 100% means totally opaque. The button on the left turns the transparency function on and off.
- black and white (this is the standard), - color with constant luminance and - color with raising luminance. The last two color sets achieve a pseudo coloring of the image, where the data values are projected into a color scale. The current color set can be inverted by the "Invert colors" button.
In contrast to many other volume viewers, MVE can turn the clipping volume by any angle over all three axis, so any tilt view inside the volume is possible. The first control sets the percentage of the volume rendering quality by choosing the number of viewport aligned slices. The speed of the visualization can be increased at the expense of quality if the number is decreased. The left button resets the quality back to 100%, the standard value. The next six controls set the six clipping planes: the left, right, back, front, bottom and top plane. The left buttons reset the positions back to the corrsponding outer border. The last three controls adjust the tilt angles of the clipping volume: the pitch, turn and roll angle. With these settings you use different than the usual 90 degree tilt angles. The left buttons will reset the angles to their right angled setting.
Data values smaller than the left transparency interval value are totally transparent. Data values greater than the right transparency interval value are totally opaque. Values between the two transparency borders are linear interpolated between transparent and opaque. The middle arrow at the slider is the transparency level arrow and represents the current transparency level setting. The width of the two transparency interval arrows - left and right beside the transparency level arrow - set the transparency window value. The transparency interval arrows can operate in two different modes: either both arrows are moving at the same time if you drag one of them (level arrow is red), or one arrow is fixed and only the dragged arrow is moving together with the transparency level arrow (interval arrows are red). The two operating modes can be switched by a double click on the slider control. The reset button on the left sets the transparency level and transparency window setting to default values calculated by the statistics of the data.
If the lighting function is turned off, only ambient lighting is used for visualization. If the lighting function is turned on, ambient lighting and diffuse lighting is used for visualization. Their percentage weights can be adjusted by the two edit controls. The lighting function needs some computation time because an additional table lookup into the gradient function for each fragment has to be calculated.
With the right most button, the camera can be rotated automatically for an animation sequence.
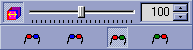
The stereoscopic view mode is turned on and off by the left "Stereoscopic View" button. The slider and the right edit control set the distance between the left and right stereo camera which corresponds to the distance between the eyes. A value of 100 means normal eye distance, smaller values mean less, greater values mean larger distance. The buttons at the bottom switch between the red/blue, blue/red, red/green or green/red glasses. Please note that the stereoscopic view mode needs to calculate two sub frames (a left and a right one) for each stereoscopic frame so it reduces the FPS rate by the factor of two. |
||||||||||||||||||||||||||||||||||||||||||||||||||||||||||||
|
|
|